Wednesday, April 19, 2017

Konfigurasi Web Proxy di CentOS 6

Ada saat dimana OS CentOS yang kita install ada dibelakang proxy dan harus menggunakan proxy untuk mengakses internet baik itu browsing maupun instalasi package yang repository nya ada di Internet. 

Nah agar kita dapat koneksi internet maka kita harus menggunakan proxy tersebut. Dibawah ini merupakan langkah-langkahnya.

1. Konfigurasi di /etc/environment
[root@localhost ~]# vi /etc/environment 
http_proxy="http://proxysrv:8080/"
https_proxy="https://proxysrv:8080/"
ftp_proxy="ftp://proxysrv:8080/"
no_proxy=".mylan.local,.domain1.com,host1,host2"

2. Apabila Ingin Apply Setting Tanpa Restart Machine, Execute Command dibawah ini.
[root@localhost ~]# export http_proxy="http://proxysrv:8080/"
[root@localhost ~]# export https_proxy="https://proxysrv:8080/"
[root@localhost ~]# export ftp_proxy="ftp://proxysrv:8080/"
[root@localhost ~]# export no_proxy=".mylan.local,.domain1.com,host1,host2"

3. Apabila Anda Perlu Internet Untuk Instalasi Package Melalui Yum
[root@localhost ~]# vi /etc/yum.conf
proxy=http://proxysrv:8080/

Done...

Install Fping dan Menggunakan Fping di CentOS 6

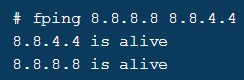
Fping adalah sebuah program seperti ping yang didevelop untuk mengirimkan ICMP protocol ke target host, perbedaan utama dengan ping biasa ialah fping dapat mengirimkan ICMP protocol ke list target IP Address secara bersamaan dalam satu intruksi/command.

Contoh :


Notes
  • Beberapa aplikasi membutuhkan fping untuk dapat menjalankan sebuah function mereka, kenapa saya buat catatan ini karna salah satunya NMS Zabbix membutuhkan Fping untuk menjalankan simple check method ping mereka.
  • Sebelum installasi dan mengikuti tutorial ini, pastikan koneksi internet Anda normal karna package fping yang saya ambil ada di internet. (Langkah nomor 1 wget ....)


Langkah-langkah instalasi Fping ialah sebagai berikut ini.

1. Download Fping package.
[root@localhost ~]# wget http://fping.org/dist/fping-3.10.tar.gz

2. Install Fping dengan Command dibawah ini.
[root@localhost ~]# tar -xvf fping-3.10.tar.gz
[root@localhost ~]# cd fping-3.10
[root@localhost ~]# ./configure
[root@localhost ~]# make
[root@localhost ~]# make install

3. Apabila Anda Ingin Fping Support IPv6 Compile dengan Command dibawah ini.
[root@localhost ~]# ./configure --prefix=/usr/local --enable-ipv4 --enable-ipv6
[root@localhost ~]# make
[root@localhost ~]# make install

4. Contoh Penggunaan Fping (Multiple IP Address)
[root@localhost ~]# fping 8.8.8.8 8.8.4.4
8.8.8.8 is alive
8.8.4.4 is alive

5. Contoh Penggunaan Fping (Range IP Address)
[root@localhost ~]# fping -s -g 192.168.1.111 192.168.1.116
192.168.1.111 is alive
192.168.1.112 is alive
192.168.1.114 is alive
192.168.1.115 is alive
ICMP Host Unreachable from 192.168.1.102 for ICMP Echo sent to 192.168.1.113
ICMP Host Unreachable from 192.168.1.102 for ICMP Echo sent to 192.168.1.116
192.168.1.113 is unreachable
192.168.1.116 is unreachable

       6 targets
       4 alive
       2 unreachable
       0 unknown addresses

       2 timeouts (waiting for response)
      12 ICMP Echos sent
       4 ICMP Echo Replies received
       6 other ICMP received

 32.9 ms (min round trip time)
 42.2 ms (avg round trip time)
 55.7 ms (max round trip time)
 4.273 sec (elapsed real time)

Done...

Konfigurasi IP SLA di Router Cisco dan Send SNMP Trap ke NMS

Objective dari konfigurasi ini ialah konfigurasi IP SLA dari Router Cisco ke sebuah IP Address dengan teknik IP SLA Tracking dan statusnya tersebut dikirim ke NMS (Network Monitoring System).

Topologi yang digunakan ialah seperti dibawah ini.


Keterangan Masing2 Nodes :


  • R1 : 192.168.1.111 (Ada Konfigurasi IP SLA ke IP R3 192.168.1.113)
  • R2 : 192.168.1.112 (Ada Konfigurasi IP SLA ke IP R3 192.168.1.113)
  • NMS : 192.168.1.102 (NMS Zabbix)


Notes :
  • Konfigurasi R1 pada dasarnya sama dengan Konfigurasi di R2, namun yang membedakan hanya IP Address saja.


Konfigurasi IP SLA di R1 ialah sebagai berikut ini.
ip sla monitor logging traps
ip sla monitor 1
 type echo protocol ipIcmpEcho 192.168.1.113
 timeout 2000
 frequency 10
ip sla monitor reaction-configuration 1 react timeout threshold-type immediate action-type trapOnly
ip sla monitor schedule 1 life forever start-time now

Konfigurasi SNMP Trap di R1 ialah sebagai berikut ini.
snmp-server community public RW
snmp-server enable traps rtr
snmp-server enable traps syslog
snmp-server host 192.168.1.102 version 2c RW
snmp-server host 192.168.1.102 version 2c public syslog

Cek IP SLA Statistik

R1#sh ip sla monitor statistics
Round trip time (RTT)   Index 1
        Latest RTT: NoConnection/Busy/Timeout
Latest operation start time: *00:00:17.327 UTC Fri Mar 1 2002
Latest operation return code: Timeout
Number of successes: 0
Number of failures: 2
Operation time to live: Forever

Contoh Trap yang Diterima NMS dari R1 (/tmp/zabbix_traps.tmp)

1. Ketika Interface R3 UP (No Shutdown)

22:32:27 2017/04/18 ZBXTRAP 192.168.1.111
PDU INFO:
  notificationtype               TRAP
  version                        1
  receivedfrom                   UDP: [192.168.1.111]:49542->[192.168.1.102]
  errorstatus                    0
  messageid                      0
  community                      public
  transactionid                  24
  errorindex                     0
  requestid                      16
VARBINDS:
  iso.3.6.1.2.1.1.3.0            type=67 value=Timeticks: (497724) 1:22:57.24
  iso.3.6.1.6.3.1.1.4.1.0        type=6  value=OID: iso.3.6.1.4.1.9.9.42.2.0.2
  iso.3.6.1.4.1.9.9.42.1.2.1.1.3.1 type=4  value=""
  iso.3.6.1.4.1.9.9.42.1.4.1.1.5.1 type=4  value=Hex-STRING: C0 A8 01 71
  iso.3.6.1.4.1.9.9.42.1.2.9.1.6.1 type=2  value=INTEGER: 2

2. Ketika R3 Down (Shutdown)

22:33:27 2017/04/18 ZBXTRAP 192.168.1.111
PDU INFO:
  notificationtype               TRAP
  version                        1
  receivedfrom                   UDP: [192.168.1.111]:49542->[192.168.1.102]
  errorstatus                    0
  messageid                      0
  community                      public
  transactionid                  24
  errorindex                     0
  requestid                      16
VARBINDS:
  iso.3.6.1.2.1.1.3.0            type=67 value=Timeticks: (497724) 1:22:57.24
  iso.3.6.1.6.3.1.1.4.1.0        type=6  value=OID: iso.3.6.1.4.1.9.9.42.2.0.2
  iso.3.6.1.4.1.9.9.42.1.2.1.1.3.1 type=4  value=""
  iso.3.6.1.4.1.9.9.42.1.4.1.1.5.1 type=4  value=Hex-STRING: C0 A8 01 71
  iso.3.6.1.4.1.9.9.42.1.2.9.1.6.1 type=2  value=INTEGER: 1


Done.....
Di catetan selanjutnya akan bahas cara konfigurasi SNMP Traps di Zabbix.
......

Thursday, September 22, 2016

Enable dan Disable X-Forwarding Header Bluecoat

Pada umumnya ketika workstation menggunakan proxy maka source IP yang dikenal oleh destination ialah source IP proxy itu sendiri.

Dengan menggunakan X-Forwarding dari CLI maka source IP address dari paket akan berisi alamat IP dari ProxySG tersebut. Dengan menggunakan ini maka memungkinkan bluecoat untuk menampilkan Source IP Address dari workstation.

Untuk mengaktifkan X-Forwarding header http, login ke CLI dan melakukan perintah berikut dari console Bluecoat.

Enable
ProxySG>enable
Enable Password:
ProxySG#config t
Enter configuration commands, one per line.  End with CTRL-Z.
ProxySG#(config)http add-header x-forwarded-for
  ok
ProxySG#(config)exit

ProxySG#

Disable
ProxySG>enable
Enable Password:
ProxySG#config t
Enter configuration commands, one per line.  End with CTRL-Z.
ProxySG#(config)http no add-header x-forwarded-for
  ok
ProxySG#(config)exit

ProxySG#


Saturday, June 11, 2016

Konfigurasi DMVPN Dengan EIGRP Routing Over GRE + IPSEC Protection

Sekalian untuk catatan biar gak lupa, karna bakal sering banged demoin teknologi WAN salah satunya DMVPN + IPSec ini makanya bikin notes ini biar praktis pas butuh tinggal buka dari internet deh.

Dalam LAB ini kira-kira Logical Topology dari LAB kita kali ini yang kira-kira seperti dibawah ini.


Lab di IOU saya Physical Topologi nya seperti dibawah ini.


KONFIGURASI INTERNET (INTERNET ROUTER)

Internet#sh run
Building configuration...

Current configuration : 1851 bytes
!
! Last configuration change at 17:00:54 CET Sat Jun 11 2016
!
version 15.4
service timestamps debug datetime msec
service timestamps log datetime msec
no service password-encryption
!
hostname Internet
!
boot-start-marker
boot-end-marker
!
aqm-register-fnf
!
!
no aaa new-model
clock timezone CET 1 0
mmi polling-interval 60
no mmi auto-configure
no mmi pvc
mmi snmp-timeout 180
!
!
!
!
!
!


!
ip dhcp excluded-address 40.40.40.3 40.40.40.254
!
ip dhcp pool public
 network 40.40.40.0 255.255.255.0
 default-router 40.40.40.1
!
!
!
ip cef
no ipv6 cef
!
multilink bundle-name authenticated
!
!
!
!
!
!
!
!
!
redundancy
!
!
!
!
!
!
!
!
!
!
!
!
!
!
!
interface Ethernet0/0
 ip address 20.20.20.1 255.255.255.0
!
interface Ethernet0/1
 ip address 30.30.30.1 255.255.255.0
!
interface Ethernet0/2
 ip address 40.40.40.1 255.255.255.0
!
interface Ethernet0/3
 no ip address
 shutdown
!
interface Ethernet1/0
 no ip address
 shutdown
!
interface Ethernet1/1
 no ip address
 shutdown
!
interface Ethernet1/2
 no ip address
 shutdown
!
interface Ethernet1/3
 no ip address
 shutdown
!
interface Serial2/0
 no ip address
 shutdown
 serial restart-delay 0
!
interface Serial2/1
 no ip address
 shutdown
 serial restart-delay 0
!
interface Serial2/2
 no ip address
 shutdown
 serial restart-delay 0
!
interface Serial2/3
 no ip address
 shutdown
 serial restart-delay 0
!
interface Serial3/0
 no ip address
 shutdown
 serial restart-delay 0
!
interface Serial3/1
 no ip address
 shutdown
 serial restart-delay 0
!
interface Serial3/2
 no ip address
 shutdown
 serial restart-delay 0
!
interface Serial3/3
 no ip address
 shutdown
 serial restart-delay 0
!
ip forward-protocol nd
!
!
no ip http server
no ip http secure-server
!
!
!
!
control-plane
!
!
!
!
!
!
!
!
line con 0
 logging synchronous
line aux 0
line vty 0 4
 login
 transport input none
!
!

end


KONFIGURASI R1 (HUB & NHRP SERVER)

R1#sh run
Building configuration...

Current configuration : 2475 bytes
!
! Last configuration change at 17:33:56 CET Sat Jun 11 2016
!
version 15.4
service timestamps debug datetime msec
service timestamps log datetime msec
no service password-encryption
!
hostname R1
!
boot-start-marker
boot-end-marker
!
aqm-register-fnf
!
!
no aaa new-model
clock timezone CET 1 0
mmi polling-interval 60
no mmi auto-configure
no mmi pvc
mmi snmp-timeout 180
!
!
!
!
!
!


!
!
!
!
ip cef
no ipv6 cef
!
multilink bundle-name authenticated
!
!
!
!
!
!
!
!
!
redundancy
!
!
!
!
!
!
!
crypto isakmp policy 10
 encr 3des
 hash md5
 authentication pre-share
 group 2
crypto isakmp key strongsecretkey address 0.0.0.0
!
!
crypto ipsec transform-set TRSET esp-3des esp-sha-hmac
 mode tunnel
!
crypto ipsec profile PROTECT-DMVPN
 set transform-set TRSET
!
!
!
!
!
!
!
interface Loopback0
 ip address 192.168.1.1 255.255.255.0
!
interface Tunnel0
 ip address 10.0.0.1 255.255.255.0
 no ip redirects
 ip mtu 1440
 no ip next-hop-self eigrp 90
 no ip split-horizon eigrp 90
 ip nhrp authentication NHRPkey
 ip nhrp map multicast dynamic
 ip nhrp network-id 100
 tunnel source Ethernet0/0
 tunnel mode gre multipoint
 tunnel key 100
 tunnel protection ipsec profile PROTECT-DMVPN
!
interface Ethernet0/0
 ip address 20.20.20.2 255.255.255.0
!
interface Ethernet0/1
 no ip address
 shutdown
!
interface Ethernet0/2
 no ip address
 shutdown
!
interface Ethernet0/3
 no ip address
 shutdown
!
interface Ethernet1/0
 no ip address
 shutdown
!
interface Ethernet1/1
 no ip address
 shutdown
!
interface Ethernet1/2
 no ip address
 shutdown
!
interface Ethernet1/3
 no ip address
 shutdown
!
interface Serial2/0
 no ip address
 shutdown
 serial restart-delay 0
!
interface Serial2/1
 no ip address
 shutdown
 serial restart-delay 0
!
interface Serial2/2
 no ip address
 shutdown
 serial restart-delay 0
!
interface Serial2/3
 no ip address
 shutdown
 serial restart-delay 0
!
interface Serial3/0
 no ip address
 shutdown
 serial restart-delay 0
!
interface Serial3/1
 no ip address
 shutdown
 serial restart-delay 0
!
interface Serial3/2
 no ip address
 shutdown
 serial restart-delay 0
!
interface Serial3/3
 no ip address
 shutdown
 serial restart-delay 0
!
!
router eigrp 90
 network 10.0.0.0 0.0.0.255
 network 192.168.1.0
!
ip forward-protocol nd
!
!
no ip http server
no ip http secure-server
ip route 0.0.0.0 0.0.0.0 20.20.20.1
!
!
!
!
control-plane
!
!
!
!
!
!
!
!
line con 0
 logging synchronous
line aux 0
line vty 0 4
 login
 transport input none
!
!
end


KONFIGURASI R2 (SPOKE & NHRP CLIENT)

R2#sh run
Building configuration...

Current configuration : 2564 bytes
!
! Last configuration change at 17:32:43 CET Sat Jun 11 2016
!
version 15.4
service timestamps debug datetime msec
service timestamps log datetime msec
no service password-encryption
!
hostname R2
!
boot-start-marker
boot-end-marker
!
aqm-register-fnf
!
!
no aaa new-model
clock timezone CET 1 0
mmi polling-interval 60
no mmi auto-configure
no mmi pvc
mmi snmp-timeout 180
!
!
!
!
!
!


!
!
!
!
ip cef
no ipv6 cef
!
multilink bundle-name authenticated
!
!
!
!
!
!
!
!
!
redundancy
!
!
!
!
!
!
!
crypto isakmp policy 10
 encr 3des
 hash md5
 authentication pre-share
 group 2
crypto isakmp key strongsecretkey address 0.0.0.0
!
!
crypto ipsec transform-set TRSET esp-3des esp-sha-hmac
 mode tunnel
!
crypto ipsec profile PROTECT-DMVPN
 set transform-set TRSET
!
!
!
!
!
!
!
interface Loopback0
 ip address 192.168.2.1 255.255.255.0
!
interface Tunnel0
 ip address 10.0.0.2 255.255.255.0
 no ip redirects
 ip mtu 1440
 no ip next-hop-self eigrp 90
 no ip split-horizon eigrp 90
 ip nhrp authentication NHRPkey
 ip nhrp map multicast dynamic
 ip nhrp map 10.0.0.1 20.20.20.2
 ip nhrp map multicast 20.20.20.2
 ip nhrp network-id 100
 ip nhrp nhs 10.0.0.1
 tunnel source Ethernet0/0
 tunnel mode gre multipoint
 tunnel key 100
 tunnel protection ipsec profile PROTECT-DMVPN
!
interface Ethernet0/0
 ip address 30.30.30.2 255.255.255.0
!
interface Ethernet0/1
 no ip address
 shutdown
!
interface Ethernet0/2
 no ip address
 shutdown
!
interface Ethernet0/3
 no ip address
 shutdown
!
interface Ethernet1/0
 no ip address
 shutdown
!
interface Ethernet1/1
 no ip address
 shutdown
!
interface Ethernet1/2
 no ip address
 shutdown
!
interface Ethernet1/3
 no ip address
 shutdown
!
interface Serial2/0
 no ip address
 shutdown
 serial restart-delay 0
!
interface Serial2/1
 no ip address
 shutdown
 serial restart-delay 0
!
interface Serial2/2
 no ip address
 shutdown
 serial restart-delay 0
!
interface Serial2/3
 no ip address
 shutdown
 serial restart-delay 0
!
interface Serial3/0
 no ip address
 shutdown
 serial restart-delay 0
!
interface Serial3/1
 no ip address
 shutdown
 serial restart-delay 0
!
interface Serial3/2
 no ip address
 shutdown
 serial restart-delay 0
!
interface Serial3/3
 no ip address
 shutdown
 serial restart-delay 0
!
!
router eigrp 90
 network 10.0.0.0 0.0.0.255
 network 192.168.2.0
!
ip forward-protocol nd
!
!
no ip http server
no ip http secure-server
ip route 0.0.0.0 0.0.0.0 30.30.30.1
!
!
!
!
control-plane
!
!
!
!
!
!
!
!
line con 0
 logging synchronous
line aux 0
line vty 0 4
 login
 transport input none
!
!
end


KONFIGURASI R3 (SPOKE & NHRP CLIENT)

R3#sh run
Building configuration...

Current configuration : 2544 bytes
!
! Last configuration change at 18:09:11 CET Sat Jun 11 2016
!
version 15.4
service timestamps debug datetime msec
service timestamps log datetime msec
no service password-encryption
!
hostname R3
!
boot-start-marker
boot-end-marker
!
aqm-register-fnf
!
!
no aaa new-model
clock timezone CET 1 0
mmi polling-interval 60
no mmi auto-configure
no mmi pvc
mmi snmp-timeout 180
!
!
!
!
!
!


!
!
!
!
ip cef
no ipv6 cef
!
multilink bundle-name authenticated
!
!
!
!
!
!
!
!
!
redundancy
!
!
!
!
!
!
!
crypto isakmp policy 10
 encr 3des
 hash md5
 authentication pre-share
 group 2
crypto isakmp key strongsecretkey address 0.0.0.0
!
!
crypto ipsec transform-set TRSET esp-3des esp-sha-hmac
 mode tunnel
!
crypto ipsec profile PROTECT-DMVPN
 set transform-set TRSET
!
!
!
!
!
!
!
interface Loopback0
 ip address 192.168.3.1 255.255.255.0
!
interface Tunnel0
 ip address 10.0.0.3 255.255.255.0
 no ip redirects
 ip mtu 1440
 no ip next-hop-self eigrp 90
 no ip split-horizon eigrp 90
 ip nhrp authentication NHRPkey
 ip nhrp map multicast dynamic
 ip nhrp map 10.0.0.1 20.20.20.2
 ip nhrp map multicast 20.20.20.2
 ip nhrp network-id 100
 ip nhrp nhs 10.0.0.1
 tunnel source Ethernet0/0
 tunnel mode gre multipoint
 tunnel key 100
 tunnel protection ipsec profile PROTECT-DMVPN
!
interface Ethernet0/0
 ip address dhcp
!
interface Ethernet0/1
 no ip address
 shutdown
!
interface Ethernet0/2
 no ip address
 shutdown
!
interface Ethernet0/3
 no ip address
 shutdown
!
interface Ethernet1/0
 no ip address
 shutdown
!
interface Ethernet1/1
 no ip address
 shutdown
!
interface Ethernet1/2
 no ip address
 shutdown
!
interface Ethernet1/3
 no ip address
 shutdown
!
interface Serial2/0
 no ip address
 shutdown
 serial restart-delay 0
!
interface Serial2/1
 no ip address
 shutdown
 serial restart-delay 0
!
interface Serial2/2
 no ip address
 shutdown
 serial restart-delay 0
!
interface Serial2/3
 no ip address
 shutdown
 serial restart-delay 0
!
interface Serial3/0
 no ip address
 shutdown
 serial restart-delay 0
!
interface Serial3/1
 no ip address
 shutdown
 serial restart-delay 0
!
interface Serial3/2
 no ip address
 shutdown
 serial restart-delay 0
!
interface Serial3/3
 no ip address
 shutdown
 serial restart-delay 0
!
!
router eigrp 90
 network 10.0.0.0 0.0.0.255
 network 192.168.3.0
!
ip forward-protocol nd
!
!
no ip http server
no ip http secure-server
ip route 0.0.0.0 0.0.0.0 40.40.40.1
!
!
!
!
control-plane
!
!
!
!
!
!
!
!
line con 0
 logging synchronous
line aux 0
line vty 0 4
 login
 transport input none
!
!
end


VERIFIKASI COMMAND

Cek IPSEC Connection
# show crypto isakmp sa
# show crypto ipsec sa
# show crypto session

Cek Routing & Connectivity
# show ip route
# ping 
# traceroute


Done!

Thursday, June 2, 2016

Sekilas Catatan Tentang VMware NSX

Saya belum tau begitu dalam tentang VMware NSX tapi saya yakin sekali konsep network virtualization dan SDN adalah masa depan dunia network dan data center. Dimana semuanya menjadi lebih konvergen, flexibel dan cepat karna provisioning di dalam virtualization sangat cepat dan ini bener2 menguntungkan organisasi karna bisa expand bisnis mereka lebih cepat dan secara bisnis time-to-market meningkat secara drastis.

Yah seperti biasa karna saya pelupa saya bikin catatan. Beberapa point dibawah ini adalah catatan saya sepulang dari VMware NSX Experience Days

1) Ada 4 fungsi yg bisa di virtual kan oleh NSX :
- Routing
- Switching
- Firewall
- Load Balancer

2) Vmware bisa berfungsi sebagai SDN juga, tapi fungsi sebeneranya adalah network virtualization.

3) Dengan NSX maka akan ada di vCenter plugin tambahan untuk network & security.

4) Vmware tidak terikat dengan protokol karna dia menggunakan teknologi overlay yg berdiri diatas infrastruktur/hypervisor yang ada. Tidak seperti SDN yg terikat dengan protokol openflow.

5) Untuk deployment masing2 minimal butuh 3 controller.

6) Ketika diaktifkan license NSX maka akan aktif fitur "vxlan, logical router, firewall".

7) Deployment Step
- Install NSX Manager supaya muncul menu baru di vCenter.
Setelah install NSX Manager baru install.
- Install NSX Controller.
- Install NSX Edge Service Gateway.

8) Minimal Requirement MTU untuk deploment VXLAN di NSX adalah 1600 MTU karna VXLAN nambah 50 bytes di framenya

9) VTEP ada di setiap host, fungsinya untuk gateway VXLAN Overlay

10) VXLAN hanya berguna untuk komunikasi antara host, makana butuh VTEP tiap host. Kalo masih satu host pake VLAN biasa aja

11) Ada 3 mode VXLAN Replication Modes
- Unicast
- Multicast
- Hybrid

12) Ada 2 jenis routing di NSX yaitu :
- Centralized, VM mau ngbrol dengan VM lain meskipun satu host trafiknya keluar dulu ke switch physical lalu balik lagi ke host.
- Distributed, nah kalo mau dynamic routing harus masang DLR ( Yang cuma nerima forwarding table) dan Control VM (Yang menghitung proses routing table).

Notes : DLR ada di setiap host dan control VM itu ada cuma satu.

13) Ada fitur bridging untuk bridge VXLAN to VLAN L2 Bridging. Jadi menghubungkan virtual dan physical, ini karna VXLAN gak bisa terhubung ke physical network.

14) Kalo mau deploy NSX minimal ada 2 host buat yg dijadiin 1 cluster sebagai Edge Cluster. Jadi arsitektur yg bener itu
- Compute Cluster, Buat VM-VM
- Edge Cluster, Buat Deploy Logical Control VM. Statenya harus active-standby supaya engga looping.
- Host vCenter buat vCenter server

15) Throughtput maximal per-edge 10Gigabit

16) Dengan deployment NSX gak perlu switch physical yg punya fitur intelegent karna fitur2 tersebut bisa dijalankan oleh si NSX.

17) Sebenernya ada 2 tipe NSX, yaitu yang berjalan di 1 hypervisor which is ada di vCenter. Dan multi-hypervisor yg berjalan di Openstack.

18) Firewall di NSX hanya L2-L4 saja tidak support sampai L7 firewall

19) Untuk membantu membuat solusi security firewall di NSX ada tool Flow Monitoring yg bisa analisa flow trafik antara VM dalam DC.


Nah kalo ada yang salah pembaca yang lebih expert mungkin bisa komen agar saya bisa perbaiki dan kalo ada yg mau diskusi silahkan. ^^

Tuesday, May 31, 2016

Konsep DMVPN Beserta Contoh Topologi & Konfigurasi DMVPN

Udah lama gak nulis lagi karna harus adaptasi di kantor baru dari system engineer jadi network presales engineer. Hahaha

Kali ini saya mau buat catetan tentang DMVPN di cisco router, berhubung kayanya ke depan bakal sering demo tentang ini di customer.

DMVPN (Dynamic Multipoint VPN) adalah salah satu konsep Design Private WAN Network yang merupakan evolusi dari model design Hub & Spoke tunneling konvensional. Jadi DMVPN itu bukan protokol tapi campuran dari beberapa kombinasi teknologi yaitu.
  • Multipoint GRE (mGRE).
  • Next Hop Resolution Protocol (NHRP).
  • Dynamic Routing Protocol. (OSPF, BGP, EIGRP dan teman2nya).
  • Dynamic IPSec Encryption.
  • Cisco Express Forwarding (CEF).
Meski di beberapa produk ada yang serupa namun yang perlu di catat sepertinya NHRP itu adalah teknologi cisco proprietary tecnology (CMIIW).


APA YANG MEMBUAT DMVPN BEDA DENGAN MODEL HUB & SPOKE KONVENSIONAL?

Teknik DMVPN menawarkan solusi menarik yang mampu membuat network kita menjadi lebih fleksibel dimana seluruh router akan saling terhubung seperti full mesh dalam satu subnet network dari WAN area network mereka.


Yang membedakan adalah apabila dibandingkan dengan dengan Design Hub & Spoke konvensional, maka dengan design seperti diatas memerlukan 3 buah tunnel yang terpisah dari Hub Router ke Setiap Spoke Router. Dengan teknik DMVPN kita melihat bahwa mGRE (multipoint GRE) akan memungkinkan 4 router memiliki satu buat interface dalam subnet yang sama 10.1.1.0/24.
Network subnet tersebut menggunakan jenis network NBMA (Non Broadcast Multiaccess) dan dengan dibantu protokol NHRP akan membuat multipoint tunnel tersebut terbentuk secara dynamic.

BAGAIMANA NHRP BEKERJA DALAM DMVPN?
NHRP adalah elemen penting dalam DMVPN yang memprovide tunnel-to-physical interfaces address resolution. Setiap spoke router akan berkomunikasi dengan hub router untuk mendapatkan physical address dari spoke router lainnya. 


CONTOH TOPOLOGI & KONFIGURASI
Dalam lab ini kita akan menggunakan topologi seperti dibawah ini.


Deskripsi :
Router 1 -> Akan berfungsi sebagai WAN/ISP network.
Router HUB -> Berfungsi sebagai Hub Router atau HQ.
Router 2, Router 3, Router 4 -> Berfungsi sebagai spoke router atau cabang.

Konfigurasi R1


Konfigurasi Physical Interfaces


Konfigurasi DMVPN / Tunnel Interface Config


Konfigurasi IPSEC 
Tambahkan konfigurasi ini kecuali di Router 1.


Dynamic Routing
Untuk konfigurasi bagian ini optional mau menggunakan ospf, bgp atau eigrp tapi di lab ini menggunakan eigrp. Jalankan konfigurasi di seluruh router kecuali router 1.


Verifikasi


Done! Semoga bermanfaat....